In this article, we will guide you through the process of installing Auxito 9005 LED headlight bulbs in your 2022 Santa Cruz. These bulbs are excellent upgrades for the dull and brown OEM headlights, providing a brighter and cooler lighting experience. To complete the installation, you will also need a trim removal tool kit, which can be easily obtained from Amazon at an affordable price.
Before Installation
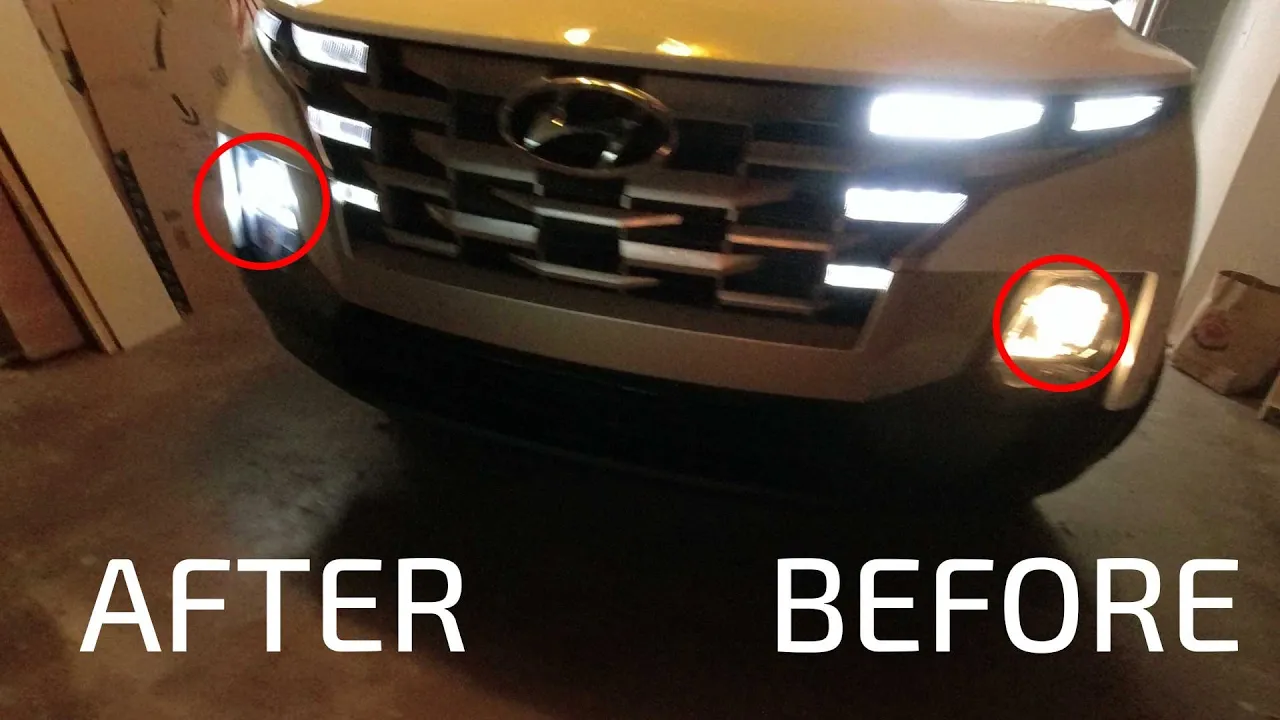
Before we delve into the installation process, let’s take a moment to compare the appearance of the stock headlights with the new LED lights. By replacing the passenger side headlight, you can observe the stark contrast between the dull and brown OEM light and the super bright and visually appealing LED light.
Using the Trim Removal Tool
The plastic trim removal tool is a valuable accessory that will aid in the installation process. Here’s how it helps:
-
- It is made of plastic, ensuring that it won’t damage the paint of your vehicle.
- It assists in popping out the plastic rivets, which secure the inner fender well.
- Around eight to ten plastic rivets need to be removed to detach the inner fender well. Additionally, two clips at the bottom and two on the front must be pulled out.
- To create enough space for removing the inner fender well, pull back the black trim along the fender about halfway. Using the tool, pry and pull to loosen the plastic clips without breaking them.
- The goal is to create a gap to remove the pinch between the plastic piece and the inner fender well and body. This can be achieved by prying with the tool and pulling with your other hand.
Removing the Inner Fender Well
With the trim piece pulled back, you can now proceed to remove the plastic rivets that hold the inner fender well in place. Ensure that you remove the two front rivets as well. Once all the rivets are removed, you will be able to pull back the inner fender well, revealing the light that needs replacement.
Accessing the Light
Behind the inner fender well, you will find a cap that needs to be removed. Turn the cap about a quarter turn to loosen it. However, be aware that the cap has a tight seal, so you may need to wiggle and pry it off gently. Once the cap is removed, you will have easy access to the light.
Replacing the Light
To replace the light, follow these steps:
- First, detach the plug by pulling it straight down after releasing the top clip.
- Twist the light to remove it quickly.
- Insert the new LED light by aligning the bottom to the four, five, or six o’clock position and twisting it in.
- Reattach the plug by sliding it straight up until you hear a click, ensuring a secure connection.
Enjoying the Results
Now that the new LED light is in place, you can witness the remarkable difference in brightness and appearance. The high and low beams emit a pure white light, enhancing visibility and the overall aesthetics of your Santa Cruz.
Finishing Touches
To complete the installation, follow these final steps:
- Align the inner fender well by utilizing the one stud sticking out and tightening the plastic nut by hand.
- Crawl under the front of the vehicle to adjust the inner fender well above the front protection plastic piece.
- Once the inner fender well is correctly positioned, reinsert the plastic plugs by flattening their faces and pushing them into the corresponding holes.
- Place the trim back into position by gently tapping it with your fist.
- Repeat the process on the other side of the vehicle.
Conclusion
After driving with the Auxito 9005 LED headlight bulbs installed for a couple of months, the transformation in lighting quality and aesthetics is truly satisfying. The installation process, aided by the trim removal tool, allows for a straightforward replacement of the lights. Upgrade your Santa Cruz with these LED headlight bulbs and enjoy the improved illumination on your journeys.
DISCLAIMER: The views and opinions expressed in this video are those of the creator and do not necessarily reflect the official policy or position of any other agency, organization, employer, or company. These views and opinions are solely those of the creator, unless otherwise explicitly stated. These videos are for entertainment purposes only, and the information therein should not be considered professional advice.
Affiliate Disclaimer: As an Amazon Associate, I earn from qualifying purchases. Some of the links included in the video description may be affiliate links, meaning if you purchase through these links, I will receive a commission at no additional cost to you. This helps support my channel and allows me to continue to make videos like this.
Please remember to do your own research prior to making any purchase.